Followers

Mar 26, 2011

Playing with paste

This is an experimental card.  The embossed panel has been coated with gesso, polished off and inked, then coated again with gesso, polished and inked.


White base card, layered with a punched border, then black.  The embossed panel is silver foil board, gesso and mica magic ink.  The flourish has been gesso coated and rollagraphed with wording.  Finished of with a little bling.  I will be playing with gesso and texturising paste again.

LoveLaurenxx

Sneak Peek

Just a little sneak peek at my claywork.


From top to bottom and left to right snowman, mouse, basket, pussycat, windchime top, porcupine, beads for windchime(behind), shooting star, porcupine, 2 x medallions, shooting star, mini wreath, 3x shooting star, flower, stamped square, 2 x shooting star.

Will be finished and decorated on Wednesday, keep tuned for an update

LoveLaurenxx

Mar 24, 2011

Thanks Paola,,,

My neice asked me to make a card for friends of hers who are renewing their marriage vows on a cruise next month.  Had to be red, they like garden and dogs.... well I have nothing doggy, didn't really think that flowery stamps were the go for this, oh and they are a scream (great sense of humour).  I knew I had seen something that would work... of course after much thought it came to me, the Calendar Girls last month had their ball and Paola (love that name) had made a card that would work perfectly with a couple of additions, so I lifted the design.  Thanks Paola!!!


Here is a link to Paola's card http://paola-sama.blogspot.com/2011/02/calendar-girlfebruary.html


Well my photography is still the pits, but you get the idea.  
The bottom sentiment is ' On the Renewal of your Vows'.   
Inside has a white panel with red trim and I am going to stamp a greeting....
"Life for you both must be very nice,
You are getting married, not once, but twice"
or
"The only thing truer than one's first love,
is to recommit to that love before family and friends"

I think I like the first verse best.  How about you?

LoveLaurenxx

Using Scraps to make a beauty!!

Hello everyone!!!  This is my type of card, it uses up scraps and was so fun to make.


 Sadly my photographic skills are not so good, I will need to get a digi cam if I am to continue this.  That way you will see how really detailed this card is.


I have used strips of off cuts, some patterned, some plain, some edged, some subtly patterned with rolla stamps.  Cut my asterisk embellies out of the back of a writing pad and then inked.  I love recycling or using scraps. I have also faux stitched around each peiece when attached to the card.


LoveLaurenxx

Mar 23, 2011

My First Challenge.....

It is such fun to belong to a group like SCS, I am learning so much and starting to push myself and my cardmaking skills a little harder and a little out of my comfort zone.


I made this card following the guidelines of a challenge.  The guidelines were to have a lattice inside a frame.  So I die cut a label from the centre of my card panel and then embossed with swiss dots on both pieces and then created a latticework over the hole.  Then stuck the label to my base card, then using dimensional tape, I have adhered the lattice panel.  Then decorated the trellis with a climbing daisy.  Stamped, matted and attached a sunny sentiment and embellished with some gathered ribbon to finish.

LoveLaurenxx

Mar 18, 2011

TGIF....

Did you see??? I have more followers......  welcome Kelly, Pearl, Angel and my Bec!!! Thank you for joining in, you have made my day!!


 Another simple card, with loads of layering.  Stamped dotty background and swirls highlighted with white gel pen, embellished with ribbon.  I do like the combination of maroon/reds and mossy greens.  Might have to play with this type combo for a few days......

LoveLaurenxx

Mar 17, 2011

Memories...........

Ribbon Mini Album I have been working on for a while.  Made from Bazzil Basics cardstock, papers and ribbon from  Kaszazz. 


 All pieces are DTP inked, the papers cut to resemble ribbon and loads of punched flowers (Carl Kikyou) and ribbon of course.


 Inside left side is put together like a little notebook with 8 leaves held together with ribbon binding at top.  All pages DTP inked with photomat and flowers.


 Accents at bottom of each page of paper and flowers.


 The right hand side of the inside is similar to the left, notebook style with ribbon binding on the side, all pages inked and embellished.

It is designed to carry memories of a seaside or tropical holiday, the perfect themed mini album to show off photos!!

LoveLaurenxx

Mar 16, 2011

All That Glitters......

I never grew out of the glue and glitter stage in my life........

This is a very simple card to make.  Take some patterned paper and cut into uneven strips, place onto double sided JAC paper leaving an uneven gap between strips.  When done, firm down paper and sprinkle with glitter!!  Trim and make your card!!

LoveLaurenxx

Mar 14, 2011

All Brand New.....

Surprise, surprise, I have followers, serious ones, WELCOME guys!!  Jeanette (Forest Ranger), Tami (BlueInks), Paola and April thank you for following my blog.  I know you have been there for a week or more, but I wanted to acknowledge you.

Since I am coming here more often I have added my babies to the site, welcome Toby and Tessa, they are the cuties on the right hand side.

I am also adding a list of inspiring blogs that I visit regularly.  They have wonderful eye candy and give me so much inspiration and motivation, why not check them out.

I have decided that since I am going to be a serious blogger (lol) I am going to learn how to colour in with a bit of flair, so hopefully in the next while you will see some changes in that department and more coloured images appearing on my cards.


LoveLaurenxx

Mar 13, 2011

Victorian Pyramid

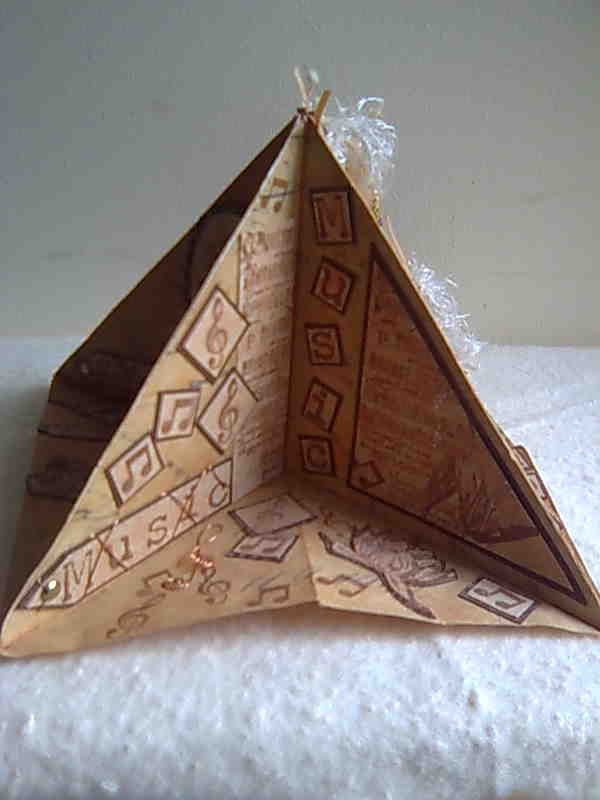
This card was made a couple of years ago and is one of my major achievements.  It took me nearly 2 weeks to make, as everything on the card is made by me, cut, stamped, embellished.  I loved the journey of making and enjoyed every minute I spent making this work of art.

The original card shape was seen in an Australian Stamping Magazine, but I have no clue who did that article.  I have made mine in very vintage/Victorian theme, loads of distress inks, stamping, altering, embellishing with wire and fibres.


 This quarter is all about postage, stamping, altering, stamping to create an interesting, vintage work.


All about Music
All about romance and femininity, the heart of the Victorian rose.

All about time.

This fantastic work folds up to a neat little triangle and can be posted in an especially made box.

Well now you know that I used to be able to stamp and create and have an imagination, but sadly that is no longer the case.  I am no longer a serious stamper, I only stamp to have fun!!!


LoveLaurenxx


Mar 12, 2011

Forest Recycle Swap

My third swap is a Full Sized Card to save the forest with some recycled elements.
I tend to be a layering kind of girl, with basic black or white base card.  Simple colour design, or monochromatic.  But never boring!!  The flowers, butterfly and stem are all made from aluminium cans, don't you just love it when something good can come from something we would throw away?


The inside is very simple with a white panel, rounded on diagonal corners and with simple stamping in black fun flower and butterfly.  Both stamps are Penny Black, inkpad Vivid Black.

The aluminium can is cut, flattened and then coloured with Stazon Ink.  Green over Blue for the butterfly with the under piece in red.  The flower is done in red.

Just a close up of the rhinestone detail on the stem.  I love using bling, bling, bling, layers, layers, layers and ink, ink, ink.

LoveLaurenxx

Mar 11, 2011

Nostalgic Butterflies....

I helped my friend prepare her samples for her first Kaszazz Workshop, then went along for moral support and general help. Was absolutely fantastic.


We had a great afternoon making these two cards, no thinking or creating, just copying from the Worshop Notes, but they are very pretty and we took our own creative turns with more butterflies and loads of Ice Stickles.


Card 1

Card 1 inside

Card 2

Card 2 inside


LoveLaurenxx


Finished Mosaic Project

OK, I did say the following week, so am only a week late putting this up for you.


I am so happy with this project, loved cutting and nibbling the tiles to make the pattern. Corrine is a wonderful and patient teacher, thank you so much.

Yes this may well have created a monster, I loved it so much. Had to go and buy fantastic round cutters (the best and dearest of course). Went over to Terrace Tiles and they have such a great selection of glass tiles.

I think my next project will be made using the glass I have in the shed, the glass that was cut and leftover from leadlighting days..... Doncha just love it when you can recycle something like that?

LoveLaurenxx