Followers

Dec 31, 2011

Free For All Challenge - Make a Dress

Hello Everyone, Happy New Year's Eve, what are you planning on tonight??? I am going to sleep it in, it will still be New Year's Day tomorrow and I won't be so tired!!

Make a dress, well that's what the challenge said, I think anyway.  It was on SCS and I cannot get back online to make sure, but I did make a card anyway.


Ok, this is very feminine, I made a dress from the Sewing Room die, embossed it, chopped it a bit and put a lace skirt and a ribbon bow and some pearls. Ribbon and bow, butterflies, a floral decoration made from the die from MFT that Miss Lynn sent me as part of the Secret Santa (lucky me!!).

A little DTP on the flower to match ribbon and butterflies.  Used a hatpin  and it all came together well.

Miss Lisa will be so proud of me. You see it has pink √, ribbon √, flower √, butterfly √, hatpin √, Lisa will be ecstatic!!!

So there you go, hope you like it!!

LoveLaurenxx

Dec 30, 2011

Party Favour Box

Hi Everyone, I am on a roll today and this is my third post, so scroll down to check them all out!!!

This little favour box is a one sheet wonder and I made it with my little friend Beth in mind.  She is wild for cats, just adores them, so I thought I would make a party favour box that she would like and make them for her birthday party (I am sure her Mum will give her and her sister a party) in June.  I usually get an invite too, fun!!!

Isn't she gorgeous??? No not my idea, saw something similar a long time ago, and as usual, I did my version of it.  It was so easy to decorate with a handcut tail, half circle and a cat's face.  A little Crystal Ice Stickles to glam her up and she is done.  I make a closure with stick on velcro.

Made with just one sheet of A4 paper or cardstock, scored at 2", 5", 7" and 10", with cut at 11" along the longest side.  Score in 2" on opposite sides along the shortest side of the card/paper.

Hope you like her my Beth!!  Although I think I might have to make her in more pink to really make my little friend happy.

LoveLaurenxx

CASEing my friend Lisa!!

Hi Everyone, second post for today, so scroll down to see more after this post!!

Hi Lisa, do you recognise this??? It is a poor man's copy of your style of cards.  But you make them so so so much better than I do, even though you supplied the punched backing for this card!!! Oh well, practice it seems.

Oh Lisa and I took some hints from you about jazzing up my photos like yours, decorations are only everything eh??

This card will be entered into the Alphabet Challenge on SCS for this week, where the idea is to copy a card from the gallery.  This was so easy for me, I love Lisa's work.  Go check out her blog and I bet you will be blown away by her talent http://craftingcottage.wordpress.com/ oh and tell me if you are not impressed!!

LoveLaurenxx

Christmas Tags just like Tim Holtz but different....

I wanted to make something for my friends Julie and Helen (crafting buddies) because they really are so very kind to me.  While keeping my eye on the Tim Holtz 12 tags of Christmas, I thought what a wonderful idea for a keepsake for them both.  This is what I came up with.

This is a handcut chipboard tag, painted with Adirondak paint dabber Lettuce and stamped with pine trees in silver metallic pigment ink.  Christmas paper is torn and layered on with cream, then deep green and a christmas ribbon.  Noel is die cut chipboard, inked with silver metallic and frosted with Crystal Ice Stickles.

A handmade pointsettia, layered over punched fern fronds is snow tipped with Crystal Ice Stickles.  A hinged ring, decorated with ribbon scraps is attached to the bottom corner.

A flourish is die cut from an aluminium can (love recycling) and the baubles from scrap papers decorated with tiny pearls, rhinestones and tiny bows.

All of this is finished with a ribbon tie and bow with a stick pin inserted.  Then the whole thing is sprayed with a little pearl spritz with a little glue included to sprinkle glitter over.

I am really pleased with the result and the girls love them.

LoveLaurenxx

Dec 28, 2011

Giving Donna Handbag Envy

Hi Everyone,

Don't faint, yes this is my second blog for today!!  So please scroll down to see the other post.

I have been threatening to make some cute little handbags since Donna and Lisa tweaked my interest in them. Now I have Donna with Handbag Envy and Lisa is going to make some tomorrow.  I am so fired up about them I am making some other ones too.  So keep tuned!!

Both of these handbags were made from original templates from Becky at Inking Idaho. This one was quick and easy and I copied it as per the photos.  Really easy to make and I didn't even read the recipe. Very cute and big enough to hold a 3x3 gift card and some goodies.

This one was a little bit trickier as I made a couple of adjustments to the template and added the pretty corners and top trim.  I love this one, in my favourite colours.... I just love green and brown together. This one would hold a 2 x 3 card and many more goodies. 

Hope you like my first efforts at some gift card handbags, they are so cute.

LoveLaurenxx

Blog Like Lisa

Hi Everyone!!

OK, so I promised myself that my New Year's resolution (from someone who just does not make them) would be to blog like my Canadian friend Lisa.  Lisa blogs first, then posts elsewhere like SCS or other albums.  I need to do that.  I have a wonderful group of followers and I want to be able to offer blog candy and post my digis free on my blog and I ask myself "how can you do that when you blog so irregularly??".

But I promise to be so good you will be tired of reading me!!! I promise!!! So here is a bit of practice to get ready for the New Year!!

So here is a card in honour of Lisa, she inspired me to make a pink flower.  The flower is made from white tulle (netting) with the TH Tattered Florals die the daisy and then dyed with Ranger Distress Ink Lipstick Red.. It has nine layers and a glittery centre and is layered on top of a lace bow that was also dyed with the same ink.

The image is from lalaland stamps is a digi and her name is Marci.  Isn't she pretty sitting there.  I think I also need to get a bit better colouring this year too, seems I am a bit out of practice.  Oh Oh Oh I coloured the pearls with a pink Copics pen too!!!

Hope you like her sitting there thinking of you!!

Oh you should pop on over to Lisa's blog Crafting Cottage, she is my inspiration for so much, she makes great cards, have fun visiting!!


LoveLaurenxx

Dec 17, 2011

T is for Tree

This card was made for the Alphabet Challenge Fill In for this week on SCS hosted by DellsDani.  She put out the challenge to find a card we had made for the challenge in previous weeks, one we liked and remake it.  Well I chose a card that I thought I could do much better with and remade it.

 So this is the remake with the image from SU lovely as a tree, I brayered a background and then stamped the image, stamped some birds and sponged the hillside. Put it in a frame and embellished with a skeleton leaf embellie made by putting some micro beads and chips on, then dipping in UTEE. I like the effect much better than just embossing the item. Further embellished with ribbon and sunflowers, and some pearls.
And here is the original with no background, stamped on a die cut and embellished with leaf embossed with UTEE heated with a heatgun, the ribbon and rhinestones.  This card was adequate, but the remake is a great improvement, I think.

Thanks for calling in, hope you get to make something this week.

LoveLaurenxx

Dec 9, 2011

The Special Secret Box

Hello Everyone!!! Wonderful Friday in Sunny Newcastle today.  Today's post is a very special box I made a few weeks ago and then shared with the Craft Group.  We had a great time making it and some loved it so much they are giving it as teacher gifts at school... I do love it when I can share something special with the girls.


 Isn't it gorgeous. The box is made with three drawers inside, that separate when opened.


It is so cute and I just love it.  Took me just on two hours to make and decorate.  The instructions are following later in this blog post.


I have always loved boxes and this would be my favourite so far.  I originally saw this on SCS and immediately fell in love with it.


Secret Box Instructions


All measurements are in inches!

You will need:
  • 6 x 9 inches cardstock (box part A)
  • 6 x 11 inches cardstock (box part B)
  • 3 squares of 4 5/8” cardstock (3 trays for box unit
  • 5 squares of 2 7/8” cardstock (layer one of side decoration panels)
  • 5 squares of 2 3/4"cardstock (layer two of side decoration panels)
  • 5 squares of 2 1/2"patterned paper (layer three of side decoration panels)
  • White cardstock for stamping images
  • Contrasting cardstock for layering stamped images
  • Assorted embellishments like pearls, rhinestones, ribbon etc for decorating box
  • Assorted stamps 2 1/2' maximum size
  • Ruler, pencil, eraser, scissors, bone scorer, paper trimmer
  • Double sided adhesive tape 
Making the Box

Piece A


Piece B


Fold each part  and adhere flaps and joins.

Stand the completed Part A and Part B together and join together with the back flap.


The Inside Boxes


Cut and fold the inside box units.  Place 1 inside box at the top position in Part A and draw a line underneath.  Place another inside box at the bottom position of Part A and draw a line above.  Now take the third box and tape into position between these two lines.

Place the top and bottom boxes into Part B.  Close the box

Embellish as desired!!

Here is a pic of the finished box again, it is so cute!!

Oh go on, have a go at it, I am sure you find it easier than you think!!

Have fun, get inky and do some craft therapy!!

LoveLaurenxx


Dec 4, 2011

Missing November Blogs

Hey Everyone, I have been missing from the Blog world a little lately, so I will make up for it now. These are the cards I made in November for different challenges, swaps and fun.   There are a few others I will blog separately.  Enjoy.

 Made this special card for my special neighbour, love her heaps.  The paper was given to me by my Canadian friend Lynn and the roses are from my Retro Rose Tutie.
 This card was a take on vintage oval mirrors, could be a sympathy card or even a wedding card.  So simple and also stunning in the two colours and all the foliage and flowers.
 Vintage bookmarks for my friend Yvonne's Victorian Swap on SCS.  Loved making these and I so love beads hanging from my bookmarks.  They seem just so decadent and what better bookmark to use in Austen
 This butterfly easel card was an attempt at a Victorian card that just did not make it even for all the distressing in the world.  Great card though, just not good enough for the Victorian Swap by Yvonne.
 Now this is the Victorian card that did make it to the Swap for Yvonne.  Love the lace, love the images, love the roses and the bookplate.  Oh and love love love the pins.
 Now my friend Lisa sent me some Spellbinder label die cuts and I got so excited at the shape of them and thought I know what they will do, so I made this card!!!! I had seen something similar a long time ago and did not know how they did that mask until those die cuts came through my letterbox!!!!
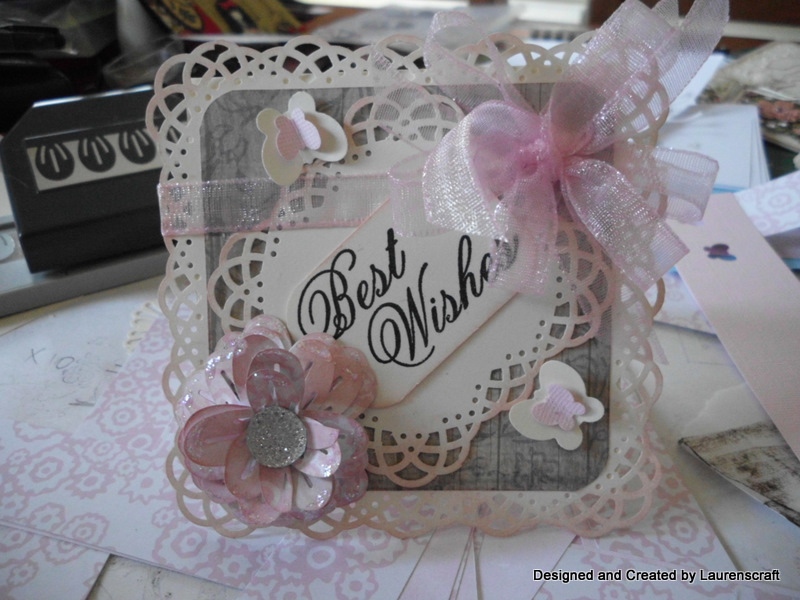
 Love to CASE cards, this is a case of my friend Lisa's style and card.  Made for Dellsdani's Monkey See, Monkey Do Swap on SCS.  It went right against everything I like (pink, yuk) but Lisa makes such beautiful elegant cards and she seems to put them out so easily that I am jealous of her apparent natural talent.  So I hope that this card did justice to her wonderful work.  Find her here: Lisa's Blog
 Made this card for my friend Lisa, to reassure her DH that he makes great digis.  Yes my friend's DH made this freebie for her blog.  Go check out her blog and see if you can find the freebies, they are great digi's and you will see how Lisa has used them.  She is a fabby cardmaker, Love you heaps Lisa!!! Go check out Lisa's Crafting Cottage
 Just had to make this card, beautiful Spellbinders Butterfly and my roses made with Spellbinders Rosemaker Creations.  This is a stunning card and at the moment this very full, very dimensional card is my style.  Hmm wonder what my style will be in another week or so???
 A card for the I Spy Challenge on SCS.  Love these challenges, mostly I have no idea what she spied, but really, does it matter?  Go ahead and just make a card!!!  I thought this one was lips, so I made a card Sealed with a Loving Kiss.... and no one seems to ever have heard that expression..... was huge in Oz in the early 60's, just goes to show I am getting older.... well, who isn't??
 Ah, I revisited my signature card of a couple of years ago, still a stunning card.  An uneven gatefold with the focal on vellum stamped with Mica Magic, (why oh why do they not still have that??) and a beautifully decorated inside and all closed up with a little clip that turns... just forgot its name.
 Oh and the lovely lovely faux leather wallet.  Taught this at craft group WCG at the start of the term.  This really is quite speccy and very easy to do.  Great for holding a gift card or voucher for someone special at Christmas or Birthday time.
 Oh and I just love these little Christmas tags, blank except for the stitching on them, so heaps of room for a greeting to add to your gift.  All embellished with a belly band saying not to open before the special day!
 I love to decorate candles, this one is done with cardstock and paper that can be removed before lighting.
 A faux Asian card done in red, black, gold and cream.  So striking with the red fibres adding dimension to it.  The embossing of the Japanese script is lovely on the square card.
 Altered diary in an Oriental Theme for Paola for hosting the Asian/Oriental swap on SCS. I joined two scraps of Yutzen paper onto a washi piece that I stamps with Japanese Script and put a very young trendy origami girl on there.
 The card I made for the Asian/Oriental Swap hosted by Sama (aka Paola) on SCS.  I loved making this card, stamping and joining the background, colouring lightly, making the braid, the lucky symbol stamped on the focal at left, the lucky knot from paper cord, the little doll and the chopstick from a toothpick to hold the lucky coin in place.  This card is all about good luck for the recipients.
 Another I Spy Challenge on SCS, so fun, and all about shoes.  I rarely use this stamp but this challenge was perfect to get it inky.  Handmade flower by Lauren and I got to use the notepad border punch that I love so much and forget to use.
 And what do we do in the Forest????? Well I don't know about you, but I toast marshymellows over the campfire if possible and since it is winter in the northern hemisphere where this card is going I thought we would build a snowman to help us.  This card is for Jeanette's (Forest Ranger) Swap on SCS.... yes it is called 'what do we do in the Forest', well now you know!!!
 I love the I Spy Challenge, here we are again, we are tall, we shine, we excite kids and I forget what else.... could be a star, but they are high, not tall, so it has to be Lighthouse.  I love a lighthouse, something mystical about them.  This is probably my most used stamp I have realised.  Good buying Lauren!!!
 Oh Oh I had to make a bonus aspect of the Forest Swap, so I decided to make a crafting lady because Jeanette sure does love her crafts and I believe she has a bug that she loves too!!
 A Christmas card that did not make the grade for the Swap it was designed for, but on reflection it does seem to be ok.  See I do make duds!!
OH OH OH OH, or should that be HO HO HO HO, these are made to give as hostie gifts for the swaps I am in, or for pressies.  Mrs Forest is getting four of these in her bag of swap cards, cos she loves loves loves Christmas Trees.  And that is no secret!!

Well I hope to be a more regular blogger.  How many times have I said that this year????? Too many so don't go back and count, just go back and look at the inspiration, at least I hope you get some inspiration here.

Get inky soon.

LoveLaurenxx